Legacy Content Warning
This section of our website is no longer maintained and may not be accurate or reflect our current ideology. Please report any content you believe to be inaccurate to [email protected].
Blog
How To Set Up Cloudflare Argo Tunnel on Ubuntu 18.04
Argo Tunnel connects your web server to the Cloudflare network over an encrypted Tunnel. Learn how to set it up on Ubuntu 18.04 here.

Mitchell Musarra
Nov 24, 2018
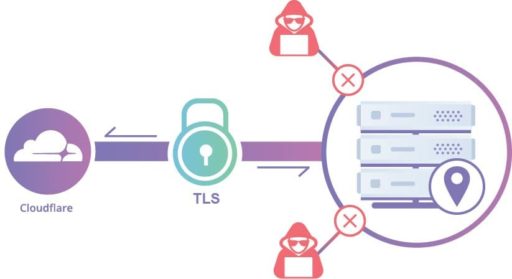
Cloudflare’s Argo Tunnel solution offering is an excellent way to expose a privately-hosted web application to the internet without needing to port-forward or re-configure your firewall. This is a great replacement for a traditional corporate VPN when used in addition to Cloudflare Access.
You can find the official documentation for Argo Tunnel here. However, I have created this short and concise article to get you started quickly.
This article assumes you already have a Cloudflare account with an active zone and a working server or virtual machine running Ubuntu 18.04.
Planning
For Cloudflare to have secure access to our internally hosted application, we need to install a daemon on a node that is capable of reaching the private application over a network. This means we can install the daemon on the web application server itself or a node with network access to the application. The latter option is a particularly good idea if the application is a “black-box” or running a non-standard operating system.
In this example, we will be exposing a privately hosted instance of GitLab CE to the internet.
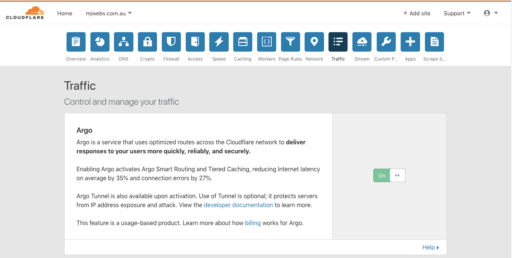
1. Enable Argo Routing.
Navigate to the zone you would like to use to proxy access to your internal application. Under “Traffic”, change the “Argo” value to “ON”.
2. Install “cloudflared”.
Run the following to install “cloudflared”:
# Download .deb from source
$ wget https://bin.equinox.io/c/VdrWdbjqyF/cloudflared-stable-linux-amd64.deb

# Unpack and install
$ sudo dpkg -i cloudflared-stable-linux-amd64.deb

# Check version
$ cloudflared --versioncloudflared version 2018.0.0 (built 2018-06-05-2106 UTC)
3. Authenticate the Daemon.
Cloudflared is authenticated on a per-zone basis. This means that you can enable the Argo Tunnel for multiple subdomains but not multiple domains (zones) per instance.
Run the following:
$ sudo cloudflared tunnel login

A browser window should have opened at the following URL:
https://www.cloudflare.com/a/warp?callback=xxxxxxxx
Copy and paste the provided link into your browser and load the page. You will see something like this:
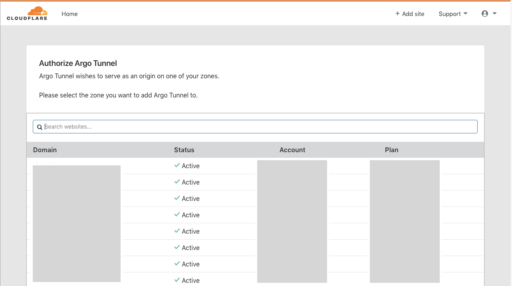
From the list of active domains in your account, choose the zone that the daemon can have access to and you will see this message:
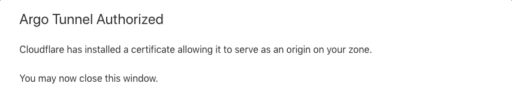
After clicking on your selected zone, the following output will also appear in your shell:
You have successfully logged in. If you wish to copy your credentials to a server, they have been saved to: /root/.cloudflared/cert.pem
4. Create Config For Cloudflared.
Move the authentication key that was just created to the ‘cloudflared’ directory in /etc:
# Move authentication key to cloudflared directory
$ sudo mkdir /etc/cloudflared
$ sudo mv /root/.cloudflared/cert.pem /etc/cloudflared/cert.pem

# Create custom configuration file:
$ sudo nano /etc/cloudflared/config.yml
Add in the following and change to suit your needs:
hostname: gitlab.your-domain.com.au # Your public facing domain name
url: http://localhost:80 # the internal web application IP and port
logfile: /var/log/cloudflared.log
5. Enable Daemon on Boot.
Run the following to enable the daemon to auto-start at boot and launch now.
$ sudo cloudflared service install

$ sudo service cloudflared start
6. Verify Installation.
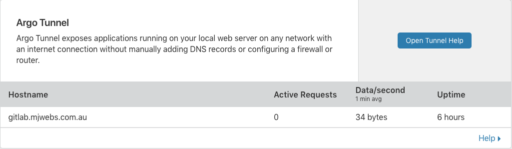
When you refresh the “Traffic” page on your Cloudflare zone, you will see a new entry under “Argo Tunnel” with the hostname you specified in your config.yml.
If everything went smoothly, Cloudflare should now be proxying requests to your internally hosted web application using the hostname you specified in the config.yml file!